/
Uploading and Organizing Images
How to upload, organize, and manage clinical images in the Dermi Atlas Image Pool, including workspace selection, tag filtering, and image comparison.
Updated May 28, 202610 min read
Clinical photography depends on more than image quality. How images are uploaded, organized, and retrieved determines whether a platform supports the clinical workflow or slows it down. A system that captures hundreds of patient images but provides no structure for managing them creates friction at every step, from documentation to follow-up comparisons.
Dermi Atlas organizes all patient images through the Image Pool, a centralized collection that stores every clinical image associated with a patient record. From the Image Pool, images can be organized by date, filtered by tags, annotated with captions, and selected into entry-specific Workspaces for analysis and comparison. This article covers the complete image management workflow in Atlas.
The Image Pool
Every patient in Atlas has a single Image Pool that contains all clinical images captured for that patient. The Image Pool serves as the master repository; individual clinical entries then draw from it by selecting relevant images into a Workspace.
The Image Pool is accessible from two locations:
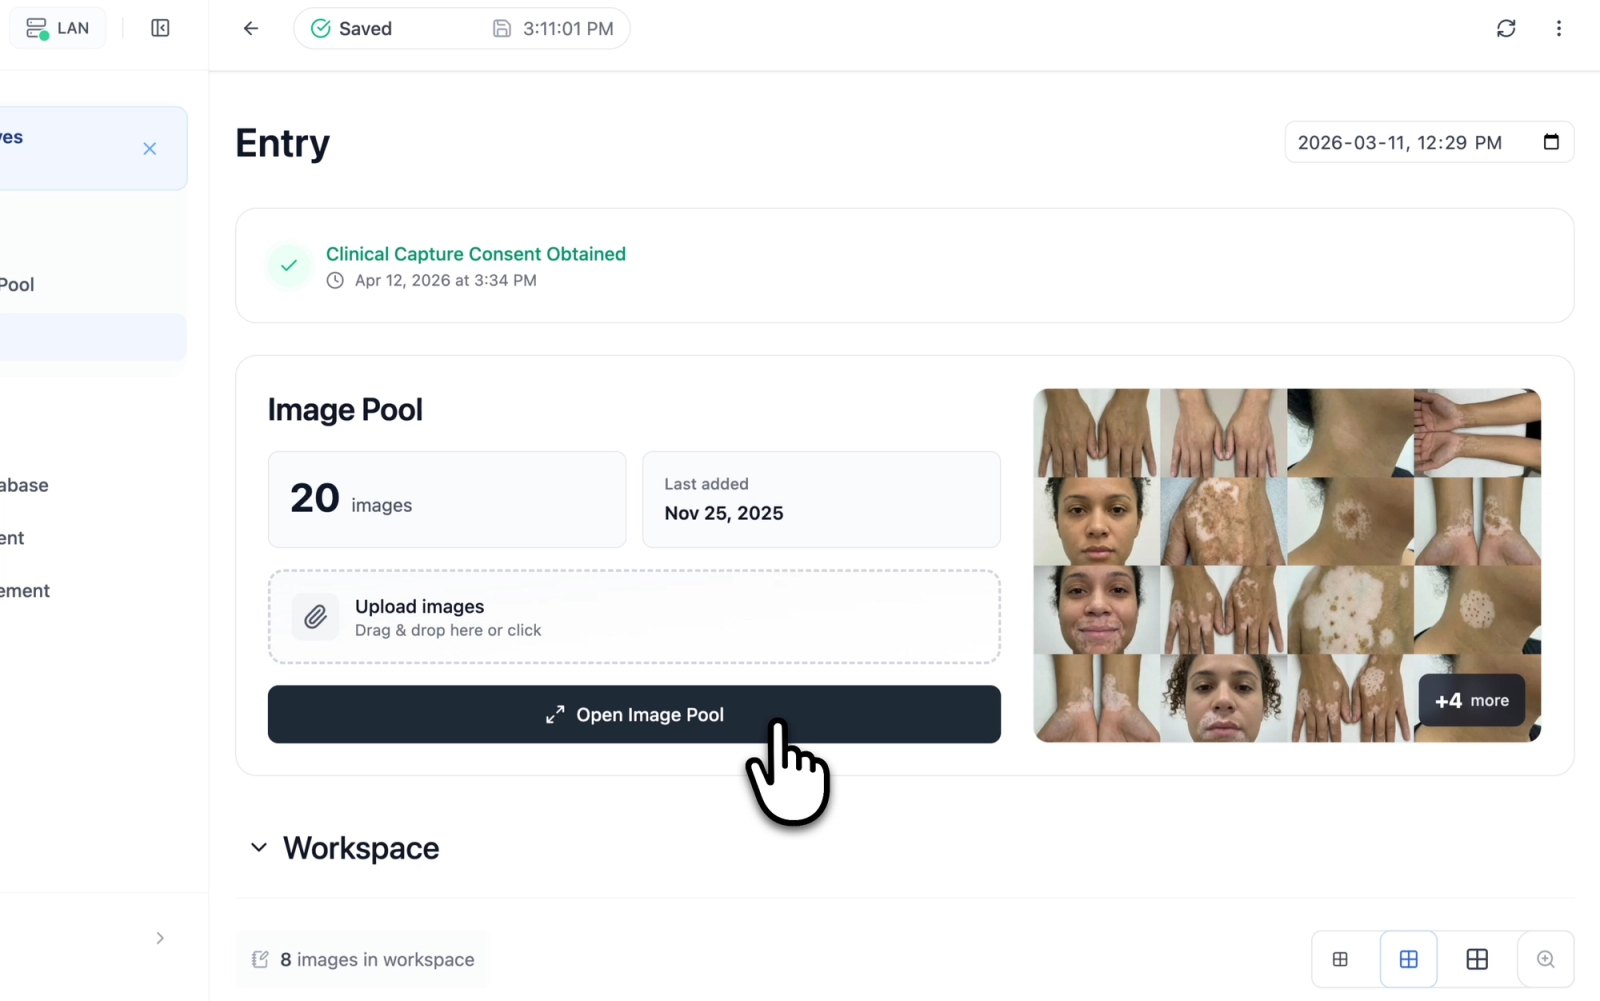
- From a Clinical Entry: The Image Pool appears as a card within the entry view, displaying the total image count, the date of the most recently added image, and a thumbnail grid of up to 16 recent images. Clicking the card opens the full Image Pool in an expanded view.
- From the Patient Record: The Image Pool can also be accessed as a standalone page, providing the same full set of management tools without the context of a specific entry.
All changes to the Image Pool, including uploads, caption edits, tag assignments, and reordering, are synchronized in real time via WebSocket. A save status indicator in the header bar confirms when changes have been persisted. No manual save step is required.
Illustrative demo with synthetic data. Learn more
Uploading Images
Supported Formats and Limits
Atlas accepts images in the following formats: JPEG, PNG, WebP, AVIF, TIFF, and GIF. TIFF images are automatically converted to PNG during processing. The maximum file size is 16 MB per image.
Multiple images can be uploaded at once. If a batch contains files that exceed the size limit or use an unsupported format, those files are skipped and a notification identifies how many were rejected and why. Valid files in the same batch are still processed.
How to Upload
Two methods are available for uploading images:
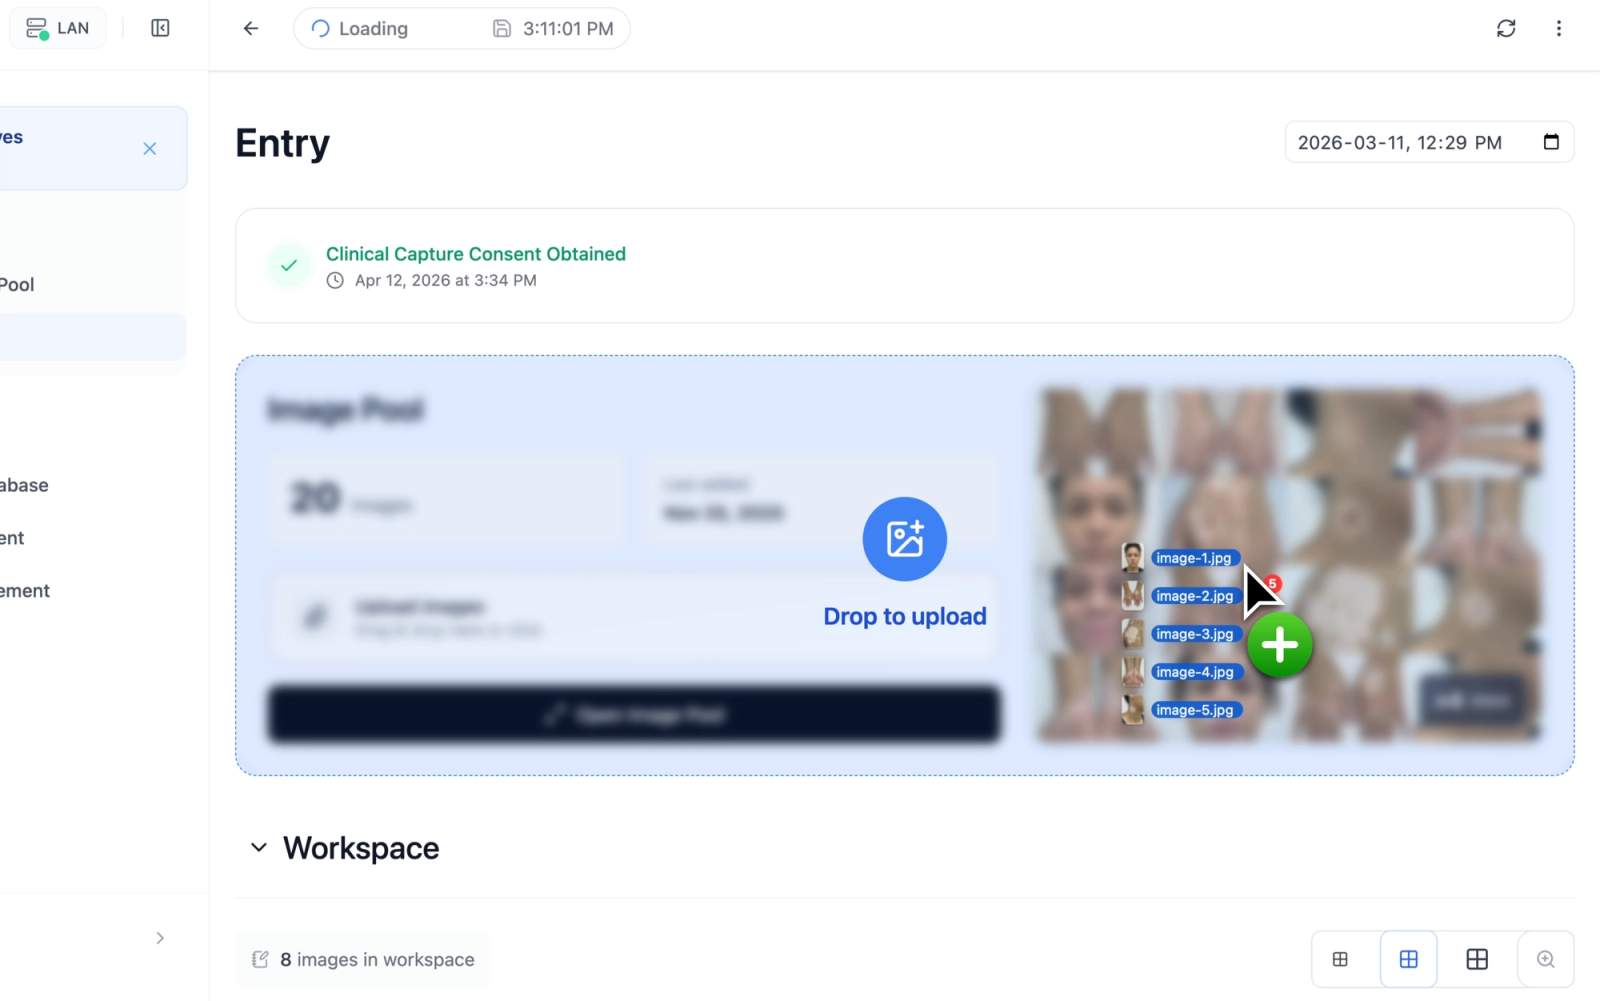
- Drag and drop: Files can be dragged from a file manager and dropped directly onto the Image Pool area. When files are dragged over the pool, a blue overlay appears with a "Drop to upload" indicator confirming the drop target.
- File picker: The "Add Images" button opens a standard file selection dialog, allowing one or more files to be selected from the local device.
When the Image Pool is empty, a centered placeholder reads "Add new images here" with the prompt "Drag & drop or use the button to select files".
Each uploaded image appears in the grid immediately with a progress indicator. Once server-side processing completes, the local preview is replaced with the final stored version. Each uploaded image is assigned an effective (capture) date taken from the image EXIF capture timestamp. When EXIF data is absent or cannot be read, the upload date and time is used instead. The effective date can be changed afterward.
Illustrative demo with synthetic data. Learn more
Consent and License Requirements
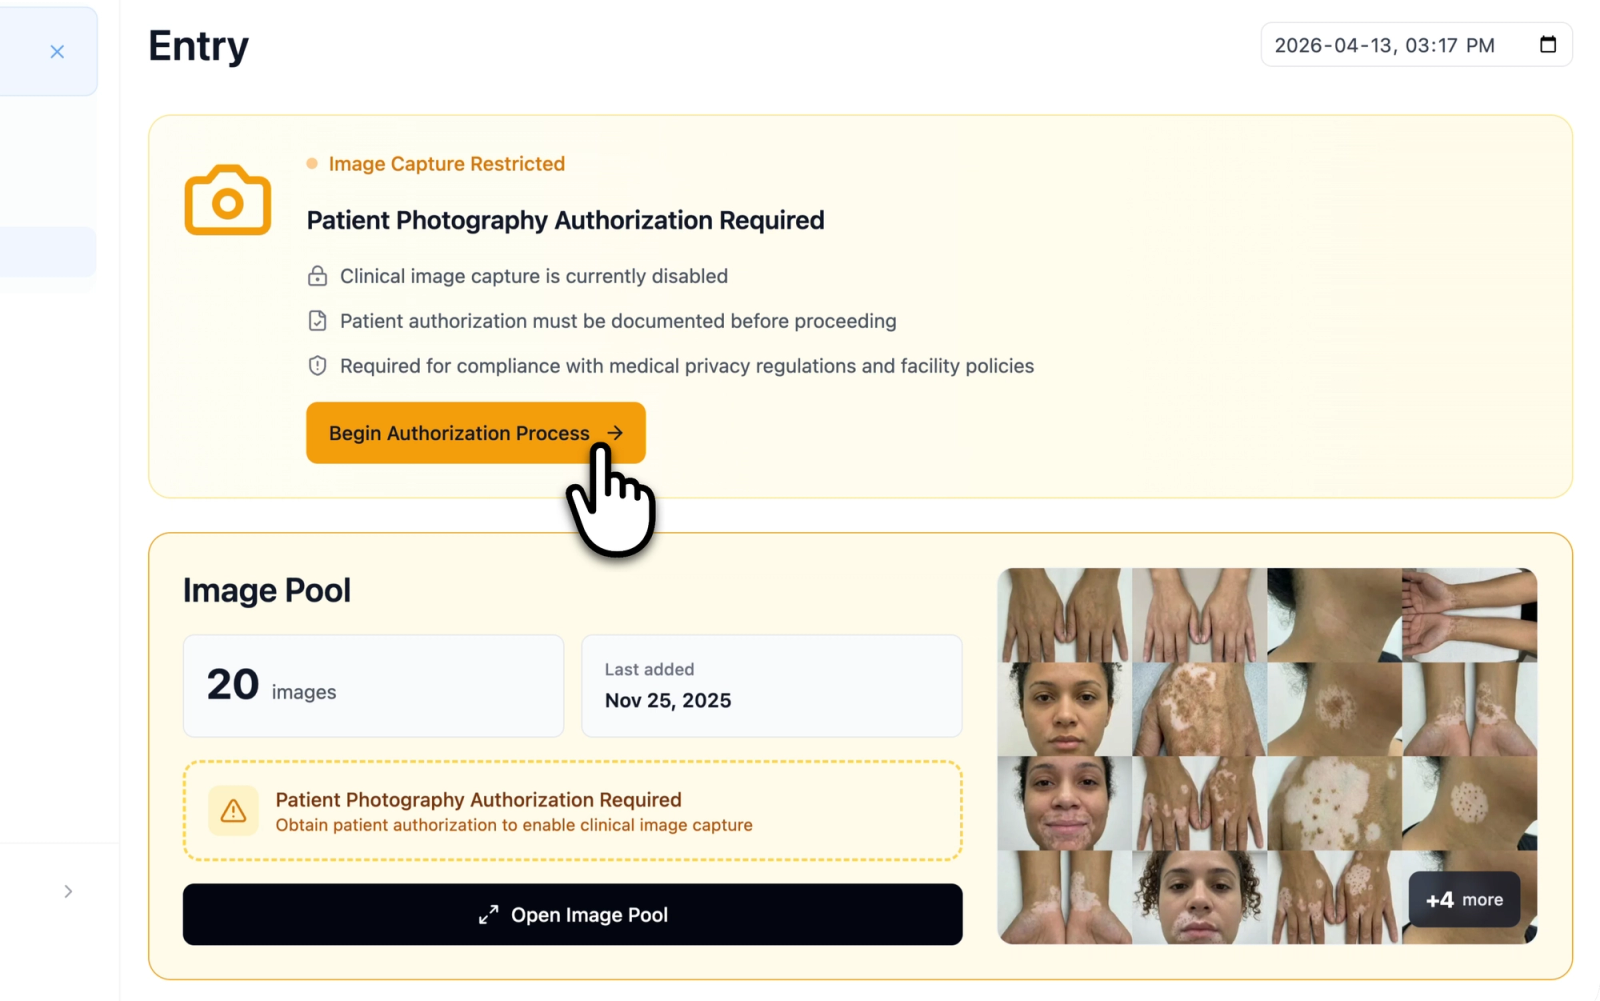
If the consent enforcement setting is configured as "Required" and consent has not yet been obtained for the patient, image uploads are blocked. The pool displays an amber warning indicating that patient photography authorization is required. Attempting to upload while restricted triggers a notification explaining that the consent form must be completed before images can be added.
License restrictions apply similarly; uploads are disabled if the deployment does not have a valid active license.
For details on consent configuration, see Clinical Image Consent.
Illustrative demo with synthetic data. Learn more
Organizing the Image Pool
Date Grouping
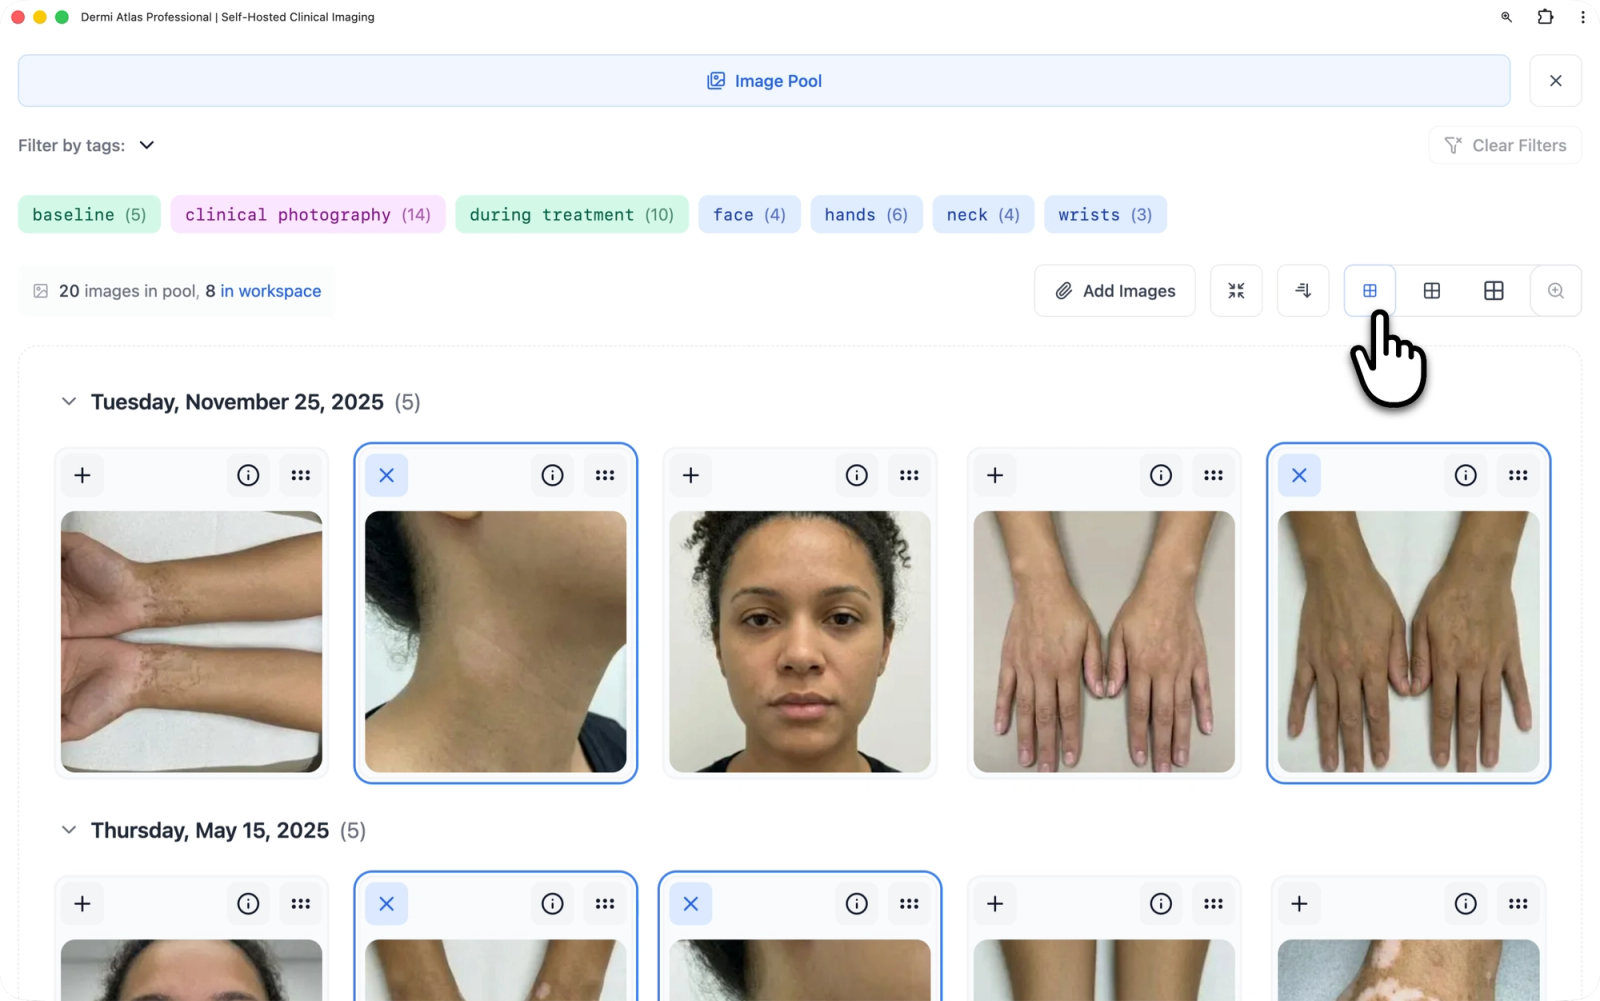
Images in the pool are automatically grouped by their effective date (capture date). Each date group header displays the full date (for example, "Wednesday, March 12, 2025") along with the number of images in that group.
Individual date groups can be collapsed or expanded by clicking the date header. The "Expand All Dates" and "Collapse All Dates" buttons in the toolbar toggle all groups at once, making it easy to focus on a specific date or scan the entire pool.
Sorting
A sort button in the toolbar toggles between ascending (oldest first) and descending (newest first) order. The chosen sort direction is saved as a user preference and persists across sessions.
Zoom Levels
Three zoom levels control the size of image thumbnails in the grid. The three settings are selected from grid-icon buttons in the toolbar, with the tooltips "Set Zoom to 1", "Set Zoom to 2", and "Set Zoom to 3". The names Small, Medium, and Large below describe the three settings rather than labels shown on screen:
- Small: Displays the most images per row with minimal detail. Only the image thumbnail and action buttons are shown.
- Medium: A balanced view that shows the image name, assigned tags (up to two visible), caption, effective date, and a badge indicating how many entries use the image.
- Large: The most detailed view, displaying the image and its metadata side by side with additional tags visible (up to five) and the full effective date.
The zoom preference is saved per user and persists across sessions. The grid layout is responsive, adjusting the number of columns based on screen size and available space.
Illustrative demo with synthetic data. Learn more
Filtering by Tags
A collapsible "Filter by tags:" section at the top of the pool lists all tags currently assigned to images in the pool. Each tag button displays the tag name, its category color, and the number of images carrying that tag.
Clicking a tag filters the pool to show only images with that tag. Multiple tags can be selected at the same time; the pool then displays images matching any of the selected tags. A badge in the filter section indicates how many tag filters are currently active.
The "Clear Filters" button removes all active selections. When no images match the current filters, a placeholder message reads "No images match the search criteria."

Illustrative demo with synthetic data. Learn more
Reordering Images
Each image card includes a drag handle (a grip icon) that allows images to be dragged into a new position within their date group. The reordered arrangement is saved automatically. This is useful for prioritizing specific images or arranging them in a clinically meaningful sequence within a given session date.
Managing Individual Images
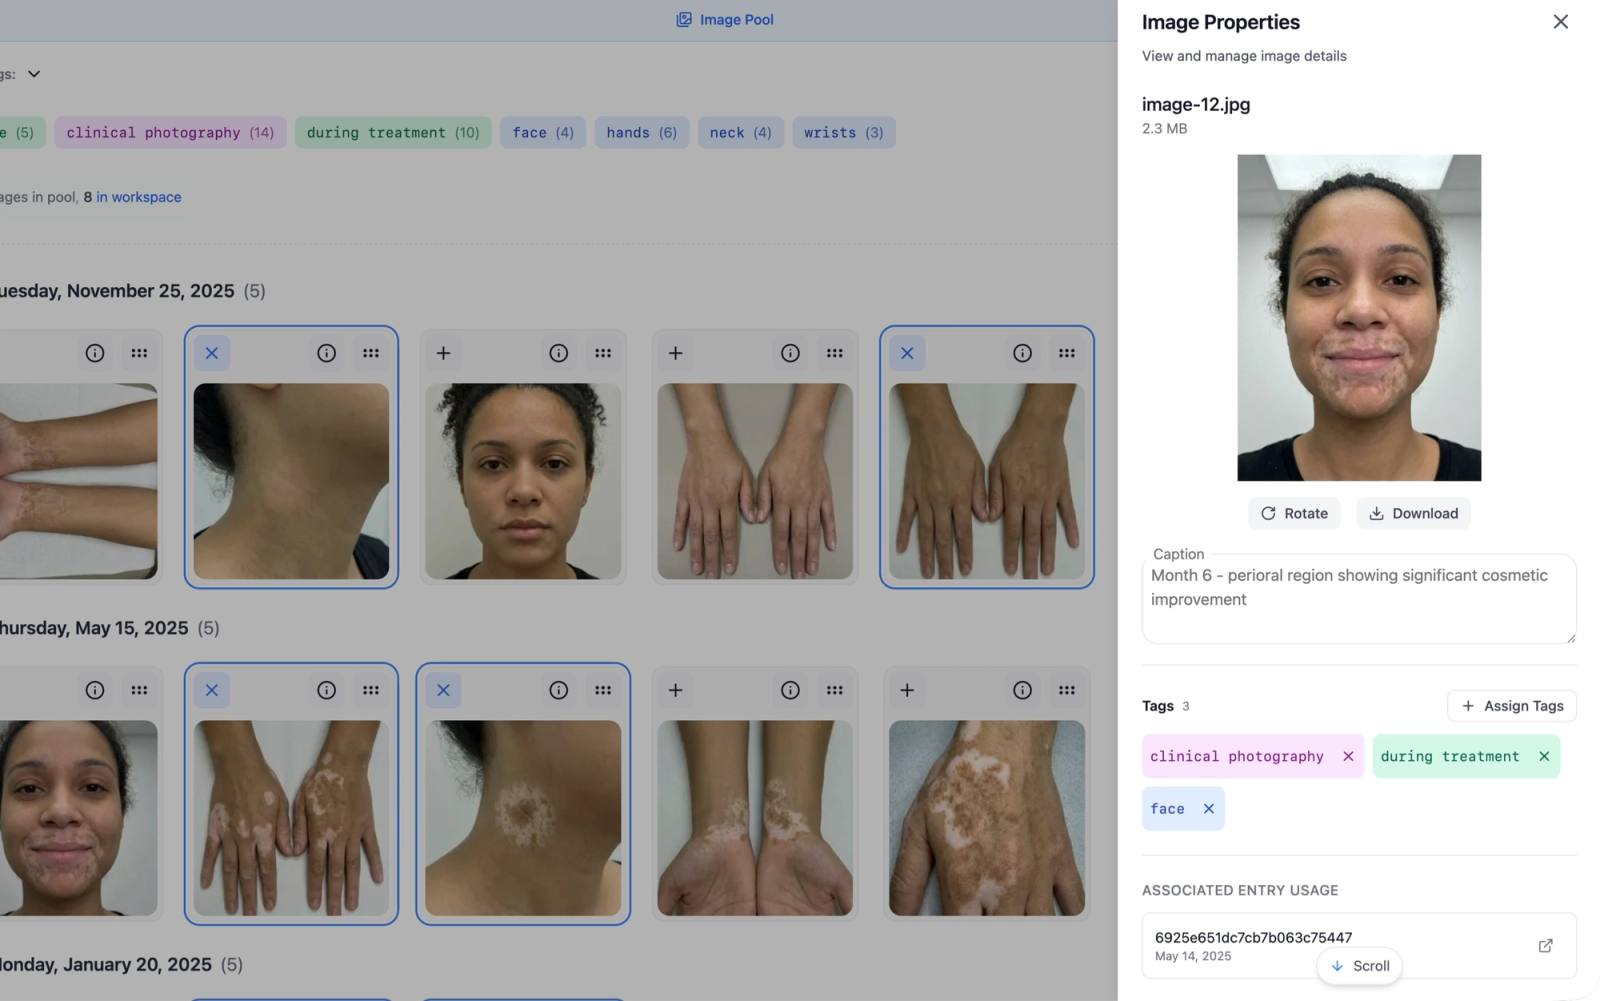
Image Properties Panel
Clicking the info button on any image card opens the Image Properties panel, which provides a centralized view for all image operations. The panel displays:
- A larger image preview
- The original filename, file size, and upload date
- Action buttons for rotation and download
- Editable fields for the caption, effective date, and assigned tags
- A list of associated entries where the image is used
- A delete button
Illustrative demo with synthetic data. Learn more
Editing Captions
Captions can be edited directly on the image card (at medium or large zoom levels) or within the Image Properties panel. Changes are saved automatically. No manual save action is needed.
Changing the Effective Date
The effective date determines which date group an image belongs to in the pool. It can be changed using the date and time picker in the Image Properties panel. After confirming the new date, the image moves to the corresponding date group.
Rotating Images
The rotate button in the Image Properties panel rotates the image 90 degrees clockwise with each click. Rotation is processed on the server and applies to all stored versions of the image, including thumbnails. A loading indicator is displayed during processing. If the rotated image is part of a comparison group, any cached alignment data for that comparison is recalculated.
Downloading Images
The download button in the Image Properties panel saves the original image file to the local device, preserving the original format and filename.
Assigning Tags
Tags can be managed from the tag button on the image card or from within the Image Properties panel. The tag assignment view shows all available tags organized by category. Tags are toggled on or off individually; assigned tags appear as color-coded labels on the image card and in the properties panel.
Tags assigned to images automatically inherit upward to their parent entries, providing a layered classification system without manual duplication.
Deleting Images
The delete button is located at the bottom of the Image Properties panel. Deletion requires typing a confirmation phrase: "DELETE IMAGE" for standard deletion, or "PERMANENTLY DELETE IMAGE" when the system is configured for permanent deletion.
Images that are currently part of a Workspace cannot be deleted until they are removed from the Workspace. If an image is in use in other entries, a warning notification is displayed.
Depending on the configured deletion policy, deleted images may be recoverable within the retention period. For details on deletion policies and retention settings, see Configuring Data Retention for Deleted Records.
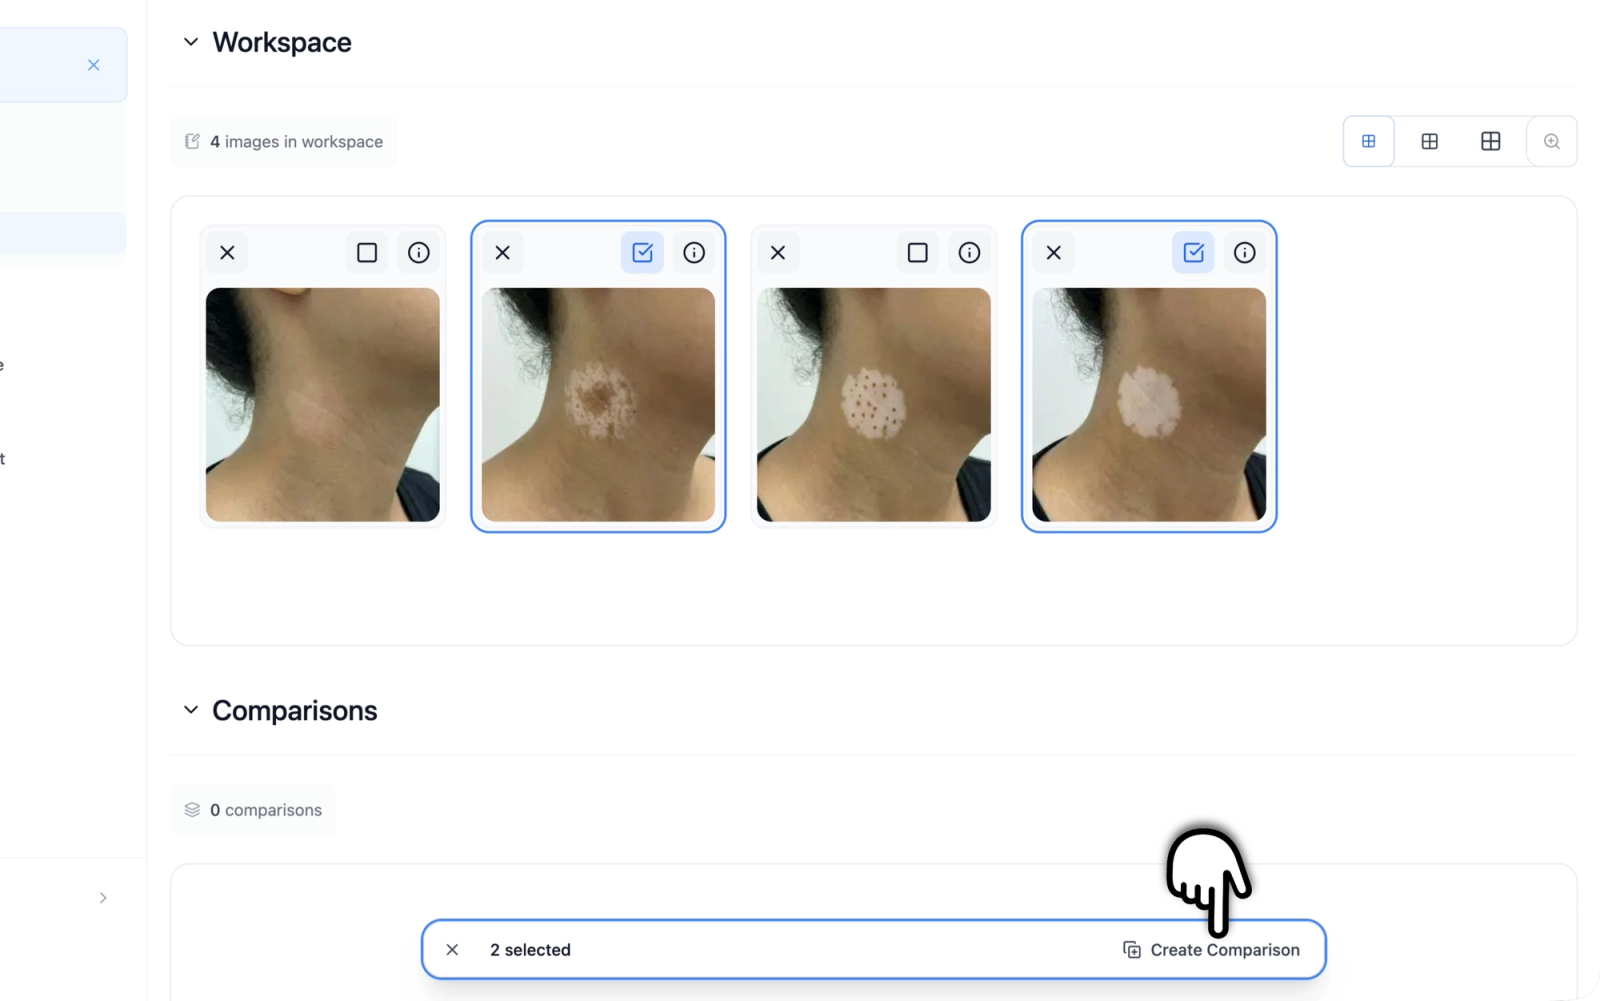
Selecting Images for a Workspace
The Workspace is an entry-specific subset of the Image Pool, used to curate the set of images relevant to a particular clinical appointment. Each clinical entry has its own independent Workspace.
From the Image Pool (when accessed within an entry), each image card displays a "+" button to add the image to the current Workspace. Once added, the button changes to an "X" for removal. Images currently in the Workspace are visually distinguished in the pool.
The Workspace section within the entry shows the selected images grouped by effective date, with the same zoom controls and sort options available in the pool. When the Workspace is empty, a placeholder reads "Curate your analysis set" with a prompt to select relevant images from the Image Pool.
The Workspace count indicator in the section header shows how many images have been selected, providing a quick reference without scrolling.
Comparing Images
From the Workspace, images can be selected for comparison by clicking the selection button on each image card. When at least one image is selected, a floating toolbar appears at the bottom of the screen. Once two or more images are selected, the "Create Comparison" button becomes available to create a comparison group.
Comparison groups are displayed in a dedicated Comparisons section within the entry. Two viewing modes are available:
- Split mode: Images are displayed side by side in vertical, horizontal, or grid layouts, allowing direct visual comparison.
- Overlay mode: Images are layered on top of each other with adjustable opacity, useful for detecting subtle changes between sessions.
Automatic image alignment (registration) can be applied to comparison groups to align images for more precise before-and-after analysis, compensating for differences in positioning or framing between captures.
Illustrative demo with synthetic data. Learn more
Exporting the Image Pool
The Image Pool can be exported as a formatted PDF report. The export option is accessible from the options menu in the Image Pool header bar. The generated report opens in a new browser tab for download or printing.
For more on available report types, see Generating PDF Reports.
What This Means for Clinical Workflows
The Image Pool workflow in Atlas is designed to keep image management efficient during busy clinical sessions. Drag-and-drop uploading, automatic date grouping, and real-time synchronization mean that images are organized and saved as they are captured, without requiring a separate administrative step.
Tag-based filtering and caption support provide structure for practices that manage large image libraries across many patients, while the Workspace and comparison tools allow clinicians to focus each clinical entry on the images that matter most for that visit.
Consent enforcement and deletion safeguards operate in the background, ensuring that regulatory requirements are met without adding manual steps to the clinical workflow.
Every feature described here is available in Dermi Atlas Professional, the self-hosted deployment designed for clinical use. The Dermi Atlas Cloud Demo provides access to core workflows for evaluation, though some capabilities may be restricted. For more on the security architecture behind patient data protection, see Our Approach to Patient Data Security.
Was this article helpful?
Your feedback helps us improve our documentation
Still have questions?
Contact our support team for personalized help
Synthetic Data Notice
All demonstrations, screenshots, and media on this page use synthetic data only. No real patient information is shown.
The following are synthetic and do not correspond to real patients:
- All human faces and individuals are synthetic and do not represent real people
- All clinical and medical images, including photographs and scans, are synthetic or simulated
- All patient names, dates, identifiers, and other details are fictional
- All clinical notes and documentation are sample content for demonstration only
Media is provided solely to illustrate platform functionality and workflows.